The stories behind the images

The stories behind the images
chairs, rome

Friday, April 23, 2010

buon appetito!

The story behind the image:

Photographing food can be a lovely way to capture the essence of a country, particularly Italy where food is such an important part of the culture. On our last visit Dianne and I joined a cooking class on the Amalfi coast and not only had a wonderful time making the food, we also thoroughly enjoyed shooting the action in the kitchen.


We made crocchette (using the potatoes in the scales above):
We made gnocchi:
We also made a classic local dessert, Delizia Al Limone:
(consider shooting the different stages of a dish)

When shooting in a working kitchen you'll find your backgrounds quite busy/distracting/messy/not all that attractive so you need to be aware of that when composing your images. You'll have to either zoom in and get close-ups of the food (as in the images above), or you make the most of the background and include the kitchen and some of the chefs (as in the images below).


The best part of the class was eating the wonderful food we had prepared:

At various times during the class Dianne and I were torn between wanting to learn how to make these delicious recipes and wanting to capture the images in front of us. This will always be the photographer's dilemma - being in the moment or capturing the moment. Have you also had that experience? We would love to hear your stories...


Photoshop post-production for scales image:
Levels layer to increase contrast.


Equipment and settings used:
Camera - Canon EOS 5D
Settings - f2.8, 1/800s, ISO 800, auto white balance, neutral picture style, shot in RAW
Lens - Canon EF 24-70mm f2.8L USM LENS
Focal length: 70mm

Happy shooting and buon appetito, from Lisa and Dianne at Capture Italy.

Tuesday, April 13, 2010

colours of positano

The story behind the image:

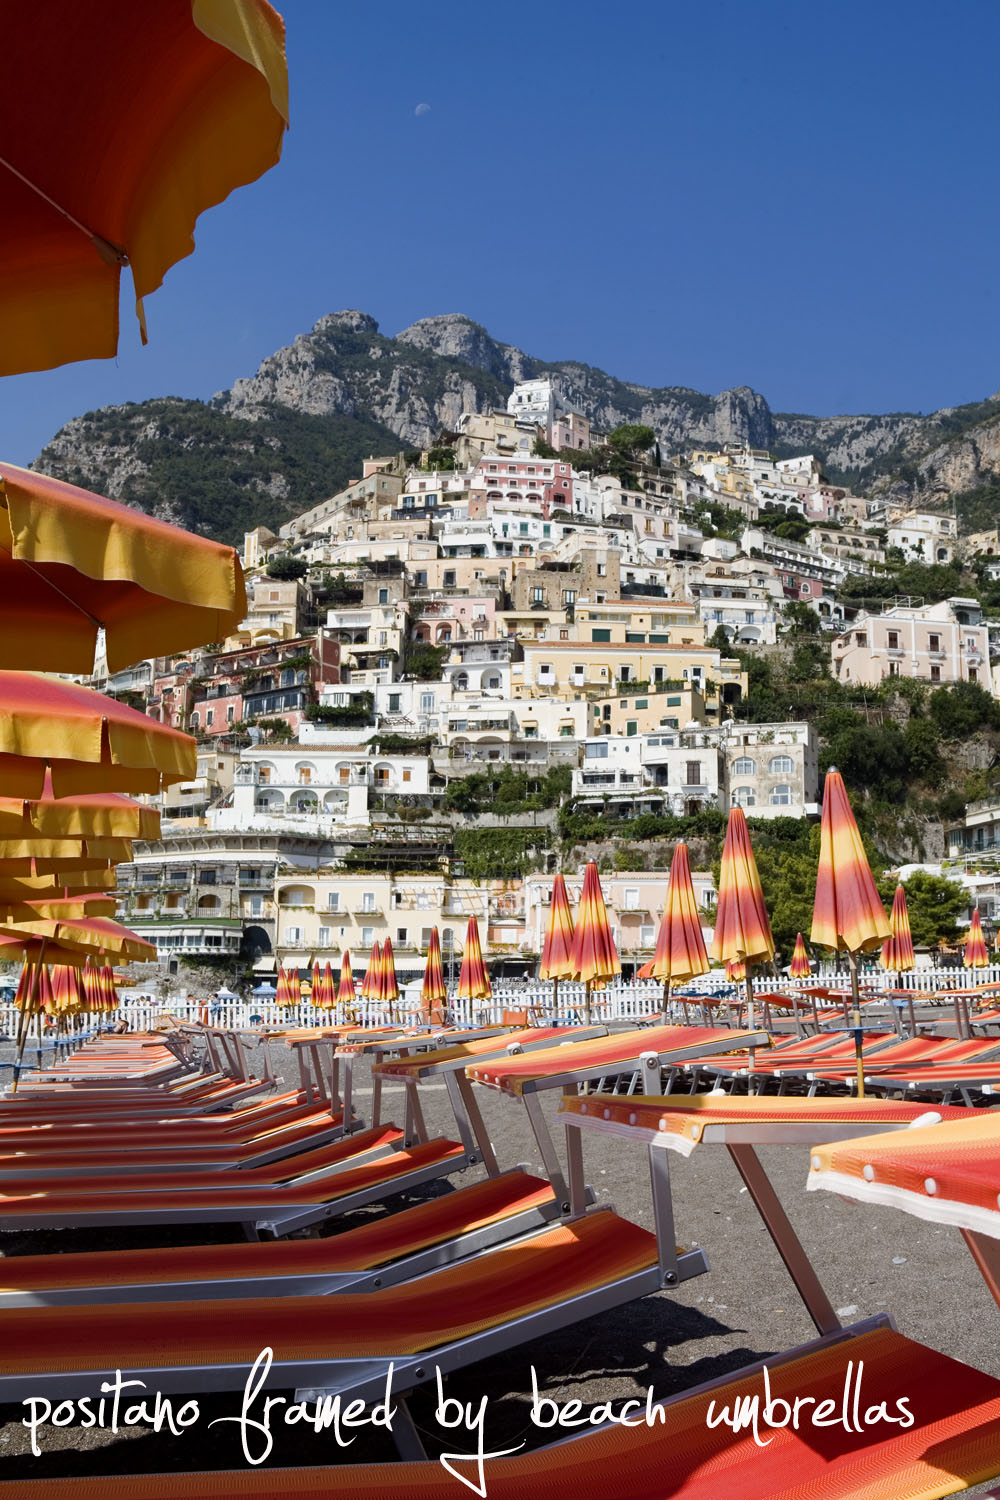
It was late morning in Positano and I was down at Spiaggia Grande (the main beach) with my camera. Surrounded by bright orange and red lettini - beach beds - and umbrellas, with a clear blue sky above, I was in colour heaven for photographers!

Colour has messages and meanings most people would only subconsciously be aware of. As a photographer, I use the visual weight of colour to add impact in my images.
Remember the colour wheel from school art classes?


The colour wheel - in this case, my son's umbrella! - helps us understand two important concepts which we can use in photography:

1. Opposite colours on the colour wheel, also known as "complimentary colours", work very well together in compositions - for example, in the beach image, the orange and red of the lettini against the blue of the sky. (fyi, "analogous colours" also work well - these are the colours that are next to each other on the colour wheel.)

2. Some colours are advancing colours, some are receding. Reds and oranges are colours that advance - they appear closest and strongest in an image, they demand your attention. Blues and greens recede - they appear further away. Using colours in this way can add depth to our images. For example, in the beach image, the orange and red lettini immediately attract our attention and draw us in; then using diagonals and some greens, the interesting middleground takes our attention to the top of the cliffs; finally the blue of the sky draws our eye up into the distance to our final viewing resting point. The colours have provided a pathway through this image, and have created a distinct foreground, middleground and background.

Below are some more examples of complimentary colours.

Red and green:
Orange and blue:
Yellow and purple:

Below are some examples of analogous colours.

Reds, oranges, yellows and greens:

Reds, pinks, mauves, blues:

Photoshop post-production for positano image:
A layers level was applied to enhance contrast.

Equipment and settings used:
Camera - Canon EOS 5D
Settings - f14, 1/100s, ISO 100, auto white balance, neutral picture style, shot in RAW
Lens - Canon EF 24-70mm f2.8L USM LENS
Focal length: 40mm

Happy shooting, from Lisa and Dianne at Capture Italy.

Thursday, April 1, 2010

roman trattoria

The story behind the image:

Dianne and I were wandering the streets around Campo dei Fiori in Rome. This wonderful poster of the very famous Italian actor Albertone - actually he was a Roman, and was a beloved resident and icon - caught our eye. The scene of him eating bucatini is from the 1954 comedy "An American Man in Rome".

(Albertone died in Rome in 2003. His funeral attracted a million mourners, the largest crowd of its kind - only surpassed by Pope John Paul II's funeral two year later.)

In this image shot by Dianne, the poster draws us in. From there we start to look around the image and see some classic Italian elements - the checkered tablecloths, the decaying facade of the building, the shutters, the terracotta colours, the shrine to la Madonna above the trattoria.

Above the shutters there was some washing hanging on a line, which can be seen in the composition below.


This image is pleasant enough, although I prefer the first image where the strong foreground interest with the poster and tables dominating the image works well. The image above just has too much in it and is lacking a strong point of interest. When composing your images, you need to remind yourself every now and then that less is more.

With that in mind, I focused on the shrine. These are everywhere in Italy. As you walk the streets, remember to look UP!


Photoshop post-production:
Dianne used a levels layer (to increase contrast).

Equipment and settings used:
Camera - Canon EOS 400D
Settings - f9, 1/200s, ISO 1600, auto white balance, landscape picture style (for rich colours), shot in JPEG
Lens - Tamron AF 18-250mm F/3.5-6.3 Di-II LD Aspherical (IF) LENS
Focal length: 18mm

Happy shooting and Buona Pasqua (happy easter!), from Lisa and Dianne at Capture Italy.

www.captureitaly.com

Friday, March 26, 2010

montepertuso, amalfi coast

The story behind the image:

It was late-afternoon in Montepertuso, a small village up in the mountains behind Positano. The tiny piazza where the bus had dropped us was busy, as many of the locals were arriving back from working in the terraced fields. We went off to explore - I made my way to the church up the hill and Dianne walked along the streets leading off the piazza.

Dianne passed one of the old women of the village and knowing her delightful face would make a wonderful shot, Dianne gestured to her camera. The woman nodded and happily posed for some shots.

Dianne's first and second shots:


The strong textured background is competing with our main subject - we want the focus to be the woman.

Dianne's third shot:


This works. The background is blurred and non-intrusive, and Dianne's captured a fantastic moment - the smile, the cheeky eyes, the wave goodbye. It was then cropped to fill the frame, although I think the original un-cropped version (which gives us more of the lady) also works.

Heading away from the piazza I also met some wonderful local women who were on their way to church. They stopped and we chatted, and then I captured this image. It's one of my personal favourites of last year's tour.


There are two approaches to shooting images of people. You can shoot discretely and not make any direct contact, or you can engage with your subjects. I often find that my approach depends on my mood and the particular circumstances, but mostly my experience has been that by directly engaging with people you not only get compelling emotive images but you also get wonderful memories.

Photoshop post-production:
Dianne used a levels layer (to increase contrast) and a filter from Alien Skin Exposure 2 filter software to warm up skin tone.

Equipment and settings used:
Camera - Canon EOS 400D
Settings - f6.3, 1/160s, ISO 200, auto white balance, landscape picture style (for rich colours), shot in JPEG
Lens - Tamron AF 18-250mm F/3.5-6.3 Di-II LD Aspherical (IF) LENS
Focal length: 250mm

Happy shooting, from Lisa and Dianne at Capture Italy.

Thursday, March 18, 2010

chianti grapes, tuscany

The story behind the image:

It was mid-afternoon in Chianti. Dianne and I had just visited the small village of Radda in Chianti.

(btw - if you ever make it to this delightful town, you must visit Decori nel Tempo (http://www.decorineltempo.it/catalogo.aspx?lingua=1) - they make beautiful, tasteful chianti ceramics and other lovely homewares and paintings, perfect for gifts. Whenever I am in the Chianti region, I make a point of coming to the shop. They close for siesta, so time your visit before or after lunch.)

We were heading out of Radda when we spotted a lovely Chianti landscape, so we pulled off onto a side road.

We both then wandered off to find the vantage point that suited us. I went one way, Dianne the other, and we spent about 30 minutes waiting (there was some rain about), composing and shooting. Dianne's perspective:


My perspective:


Both of these images have definite leading lines - line is the strongest element of design, and can determine the emotional impact of an image. As a photographer you need to be aware of the subtle feelings associated with the different types of lines.

Dianne's image contains curved lines. These are the lines we expect to see in nature and they are soft and relaxing, and they also lead us gently through the image. My image contains strong diagonal lines (which is more my style), and they give the image a more directional and energetic feel. In this instance I feel Dianne's image is the more successful of the two.

When shooting a wide landscape scene, don't forget to also shoot the smaller detailed elements of that same scene. (In fact, I shot the close-up of the grapes before I even started on the lansdcape. I find that it's a nice way to ease into the expansive wide angle work.) By having the small details as well as the "big picture" your story is stronger and more interesting. I find it's also more personal, as what you notice as a small detail depends on what catches your eye.

Photoshop post-production for grapes:
None. (It was a cloudy day, and that automatically creates stronger contrasts and colours.)

Equipment and settings used for grapes:
Camera - Canon EOS 5D
Settings - f4.0, 1/200s, ISO 200, auto white balance, neutral picture style, shot in RAW
Lens - Canon EF 24-70mm f2.8L USM LENS
Focal length: 64mm

Happy shooting, from Lisa and Dianne at Capture Italy.

Friday, March 12, 2010

vintage red vespa, rome

The story behind the image:

It was mid-morning in Rome. I was wanting to capture some quintessential Italian images and then I saw it - a classic red vintage vespa! These old vespas are getting harder to find, and for me, nothing says vintage vespa more than red...

There was a man standing quite close to the vespa, and there was also a pole leaning on the wall next to the vespa. I decided that neither of these elements added to the scene I wanted to capture so I moved around the vespa to see if I could shoot at an angle or distance that would eliminate them from the scene. Unfortunately, given the view and perspective I wanted, it wasn't possible. I also knew that removing a man's leg and/or pole was a very quick and easy exercise in photoshop so in this case I decided it was worth shooting.

I shot three images of this scene. The first, as I find is often the way, was the best. It is the one I have chosen for the Capture Italy website gallery. It has clear diagonal lines and good context. This is it below, before photoshop post-production.


I then tried two different angles, in an attempt to include less of the unwanted background elements, but neither of them worked for me. You can see them below:


Unwanted people and items in backgrounds are a common challenge you face when shooting street scenes. You can choose to include them to add interest to the scene (in this case neither the man nor the pole added to what I was trying to achieve - if the man had been a typical old Italian man, and the pole had been his walking stick, perhaps they might have been worth including); or you can attempt to shoot so as to exclude them. This means you need to walk around your object and shoot from different angles/perspectives. Your last resort is to rely on photoshop.

Photoshop post-production:
I used the clone tool to remove the pole and leg, I applied a layers level and a filter from Alien Skin Exposure 2 filter software for the vintage yellowing effect.

Equipment and settings used:
Camera - Canon EOS 5D
Settings - f3.2, 1/200s, ISO 400, auto white balance, neutral picture style, shot in RAW
Lens - Canon EF 24-70mm f2.8L USM LENS
Focal length: 48mm


Happy shooting, from Lisa and Dianne at Capture Italy.

www.captureitaly.com